Falcon/Mustang Power Booster Brakes Installation
By Fiero Bob/Terry Colley
Use The Back Button To Return To the Tech Menu
Mark Dinzebach has written a set of instructions for installing a power master cylinder on a Falcon. Recently we made this conversion. Here are Mark's instructions and our comments:
Parts Required:
parts marked with an * will have later comments. Read it all before you start.Salvage Yard:
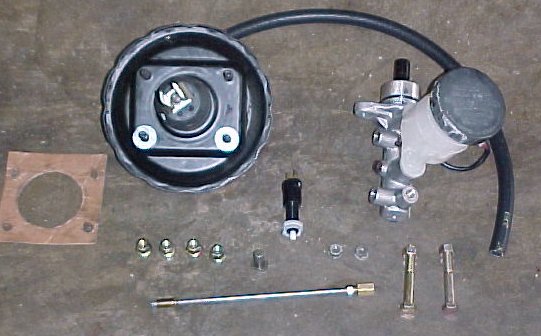
Brake booster/master cylinder from '89-'94 Geo Metro or Suzuki Swift. Make sure to get the pin that attaches the booster to the pedal and the nuts that mount the booster to the firewall. Also get the foam gasket that is on the firewall. Trace this onto a piece of poster board to make a template for installing. Take a piece of paper and a pencil or greasy hands with you. If there is no gasket get a rubbing of the firewall with the large clearance hole and four mounting holes. This is important.
Wiring pigtail to stop lamp switch on '73-'79 Ford Pickup. Cut off as much wire as possible. *
Auto Parts Store:
Check your engine for a vacuum port, preferably an unused port directly into the center of the manifold. Get a fitting to connect 3/8in hose to whatever matches this port. This will most likely be 1/4 or 3/8-pipe thread.
Assembled parts ready for installation
1) Disconnect battery
, (I know, every thing starts out this way and usually for no reason. This time there is a reason.)2) Remove hood and left hood hinge
.('60-'63 with prop rod may be able to leave hinge in place.)·
We did not have to remove the hinge on the '65. Be sure to trace around the hood hinge on the hood (and on the fender if you remove the hinge) with a scribe or pencil before you remove anything. This will save a lot of time realigning the hood.3) Remove brake pedal
(you probably needed to lube the pivot anyway)4) Disconnect brake lines from junction at master cylinder. Remove the master cylinder. Install the two bolts that you bought in the holes where the master cylinder was. Loosen the two bolts that are above the master cylinder mounting holes. Give them a sharp rap with a hammer to loosen the spring clip type nuts that they are screwed into. Remove these bolts and the nuts that are inside of the car.
·
Leave the two nut clips at the top mentioned here in place until you get the holes cut. They can be used to align and hold the template. In our case the two lower holes which originally mounted the master cylinder were too close to the new holes and would have interfered with the new master cylinder retaining nuts so we removed them instead and did not use the two 3/8in bolts.5) '60- '64 connect the two green wires together that were on the brake light switch. I cut and soldered them. '65 can disregard this step.
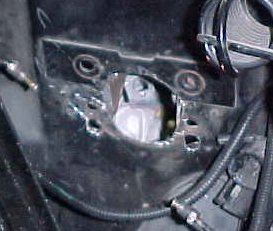
6) Tape template to firewall, upper holes in template line up with upper holes on firewall. Drill two 3/8" holes at bottom of template. Remove metal from firewall that is in center hole of template. This should be about 3/4" of metal.
·
We had to remove a portion of the pedal bracket to about 1/2in inside to clear the nose of the booster.Firewall Ready For Installation
7)
Remove master cylinder from booster. Remove reservoir from master cylinder by pushing out rollpin.·
We did not need to remove the reservoir8) Hold booster up to firewall. It should sit at a slight upward angle because of the two bolts that are in the old master cylinder holes. Figure out how many 5/16" washers are needed on the lower studs to hold the booster off of these bolts. I used 6 on each lower stud, this will vary as it depends on the thickness of the washers that you bought. On the inside of car, trim enough metal from the pedal support to allow the lower nuts to fit. When you get the spacing right, bolt the booster to the firewall.
·
Since we did not use the bolts here we only needed two washers on each stud to make the cylinder set level. This however caused another change, which will be discussed when the pedal is connected.9) While the Geo master cylinder is still off of the car, screw the piece of 3/16" brake line into the front port that points up. Bend the line to the right and then under the master cylinder so that it points to the left side of the car. Attach the coupling to the free end of the line. Remove the line and set aside for the moment. It is much easier to bend this line while the master cylinder is still off of the car.
*
The line will be bent into 3/4 of a circle and come out about in line with the back port.10) Install the master cylinder to the booster. Attach the line that comes from the right front wheel of the car to the front, side port there is enough line on the car to do this if you bend carefully. Install the line you made and attach this to the line that comes from the left front wheel. Attach the remaining line that runs to the rear of the car to the rear port in the master cylinder. Set the reservoir in place and use the 3/16" cotter pin to hold it in place. You may have to indent the edge of the cowl brace slightly with a hammer. It doesn't need to move very far and is not noticeable when you are done. There are two wires that come out of the Geo reservoir that worked a low fluid light. They can be cut off or left on.
11) Remove the pin on the brake pedal that the old push rod connected to. This can be easily done by grinding the back of the pin flush with the pedal, and using a drift punch to drive it out. Remove the rubber bumper at the top of the pedal. Temporarily install the pedal. Mark the hole where the rod attaches. Remove the pedal and drill a 7/16" hole in this location. The hole should be about 3/4" below the hole that the pin was removed from. Install the pedal and connect the new push rod with the pin from the Geo.
·
If you use the recommended 6 washers under each of the lower mounting studs this is where the pedal connection will be. If you only use two like we did, the pedal connection will be at the original hole (after it is drilled out to 13/32in). The difference in the two positions will be in feel and travel. Mounted like we did will cause lighter more powerful feeling brakes with longer travel while the longer position will have a stiffer feel and less travel.·
Also, before you re-install the pedal, mount the brake light switch in the hole where the rubber bumper was (round switch in square hole). Set the switch so the pin will be compressed against the pedal-mounting bracket when the brake pedal is in its normal position.
Brake Light Switch Installed
12) '60-'64 reconnect the battery.
The brake lamps should be on. Find the dark green wire where the wires exit the steering column. Disconnect this wire and the brake lamps will go off. Crimp the "bullet" connectors on the Ford truck pigtail. Plug the pigtail into the green wire that you disconnected. Plug the stop light switch into the pigtail. The lights should now be on. Test the switch by pushing the button. The lights should go on and off. Install the switch into the hole that the rubber bumper was removed from. Adjust the two nuts until the lights are off. On '65 crimp the "spade" connectors onto the pigtail. Plug these wires into the plug that was on the old brake light switch. Everything else installs the same as the early cars.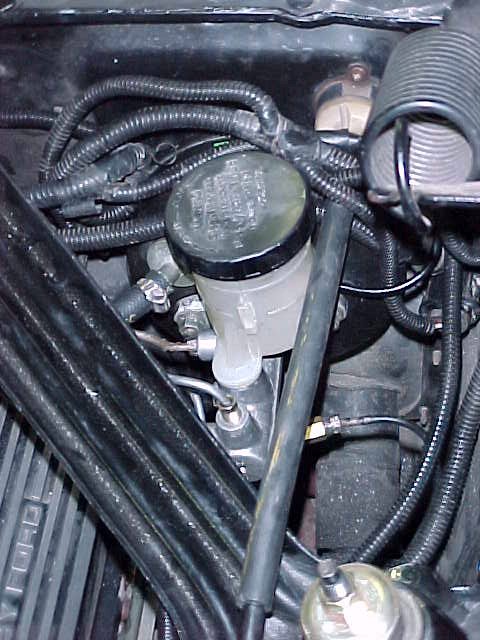
·
Rather than use the pigtail and "spade" connectors, we cut the original connector off right at the connector and crimped on a pair of female .25" "spade" connectors. These were then directly connected to the switch.13) Bleed the brake system now. It's a lot easier to do it with the hood off.
Looks Like a Factory Installation
Expenses incurred for this project: Master Cylinder $50.00 Misc. Parts $10.00...Total Cost $60.00
Not bad to have super easy, quick stopping brakes. I would definitely recommend this conversion to anyone that does not like a hard pressure pedal.
Edited by G. E. Buzek
Comments or questions?
![]()